Access management is hard. Here's how Abbey can help!
How Abbey Works
January 2, 2024 · 10 min read
Whether you’re a DevOps or security engineer for a small startup or a Fortune 500 company, one thing you’ll always find the organization struggling with is access management: what access to give to whom, and how to do so efficiently without going insane.
Giving someone the “correct” amount of access so that they can't do a significant amount of damage (intentional or not) but still have enough access to complete their tasks and responsibilities without being blocked is the holy grail, but unfortunately next to impossible.
For that reason, there are generally two access management strategies: giving too much access, or giving too little access. Each has its own pros and cons, but both are less than ideal.
If you would rather watch a video on the same topic, click the video below!
Giving too much access
By far the easiest way of solving the “access management” problem is to shower your engineers with so much access to resources they never have to ask anyone for more. The biggest upside of this strategy is that your team can develop and deploy at breakneck speeds as they don’t have to worry about tedious roles and permissions. Waiting for the security team to give you access to a specific service is also a thing of the past. Unfortunately, that is also where the benefits end and the downsides start.
By allowing your engineers access to more than they need, you make your product and company less secure than they should be. While it’s true that an employee will usually not delete your important S3 buckets or database tables on purpose, they might do so by accident. Or worse; your employee's credentials might fall into the hands of malicious adversaries who will happily exploit the overly permissive policies to steal customer data, among other things.
Giving too little access
The other alternative is giving your engineers too few permissions. While this makes your organization much safer and less susceptible to accidents and attacks, that’s about where the benefits end.
The biggest drawback of restrictive access policies is that engineers will need access to resources they don’t currently have access to. Their only option is to request access through a ticketing system or to message someone in another team, both of which can take a long time. This will slow down your team, and inevitably decrease their output.
Not to mention that access revocation through a process like this is usually uncommon due to the lack of automation for access management. This causes a user's access to grow over time and become more and more vulnerable.
Abbey can help
Thankfully, Abbey is on a mission to make access governance much easier allowing you to grant access to the resources your engineers need, only when they need them without the hassle of manual access management.
The diagram below visualizes the process/flow of an employee using Abbey to acquire access to cloud resources services using Abbey.
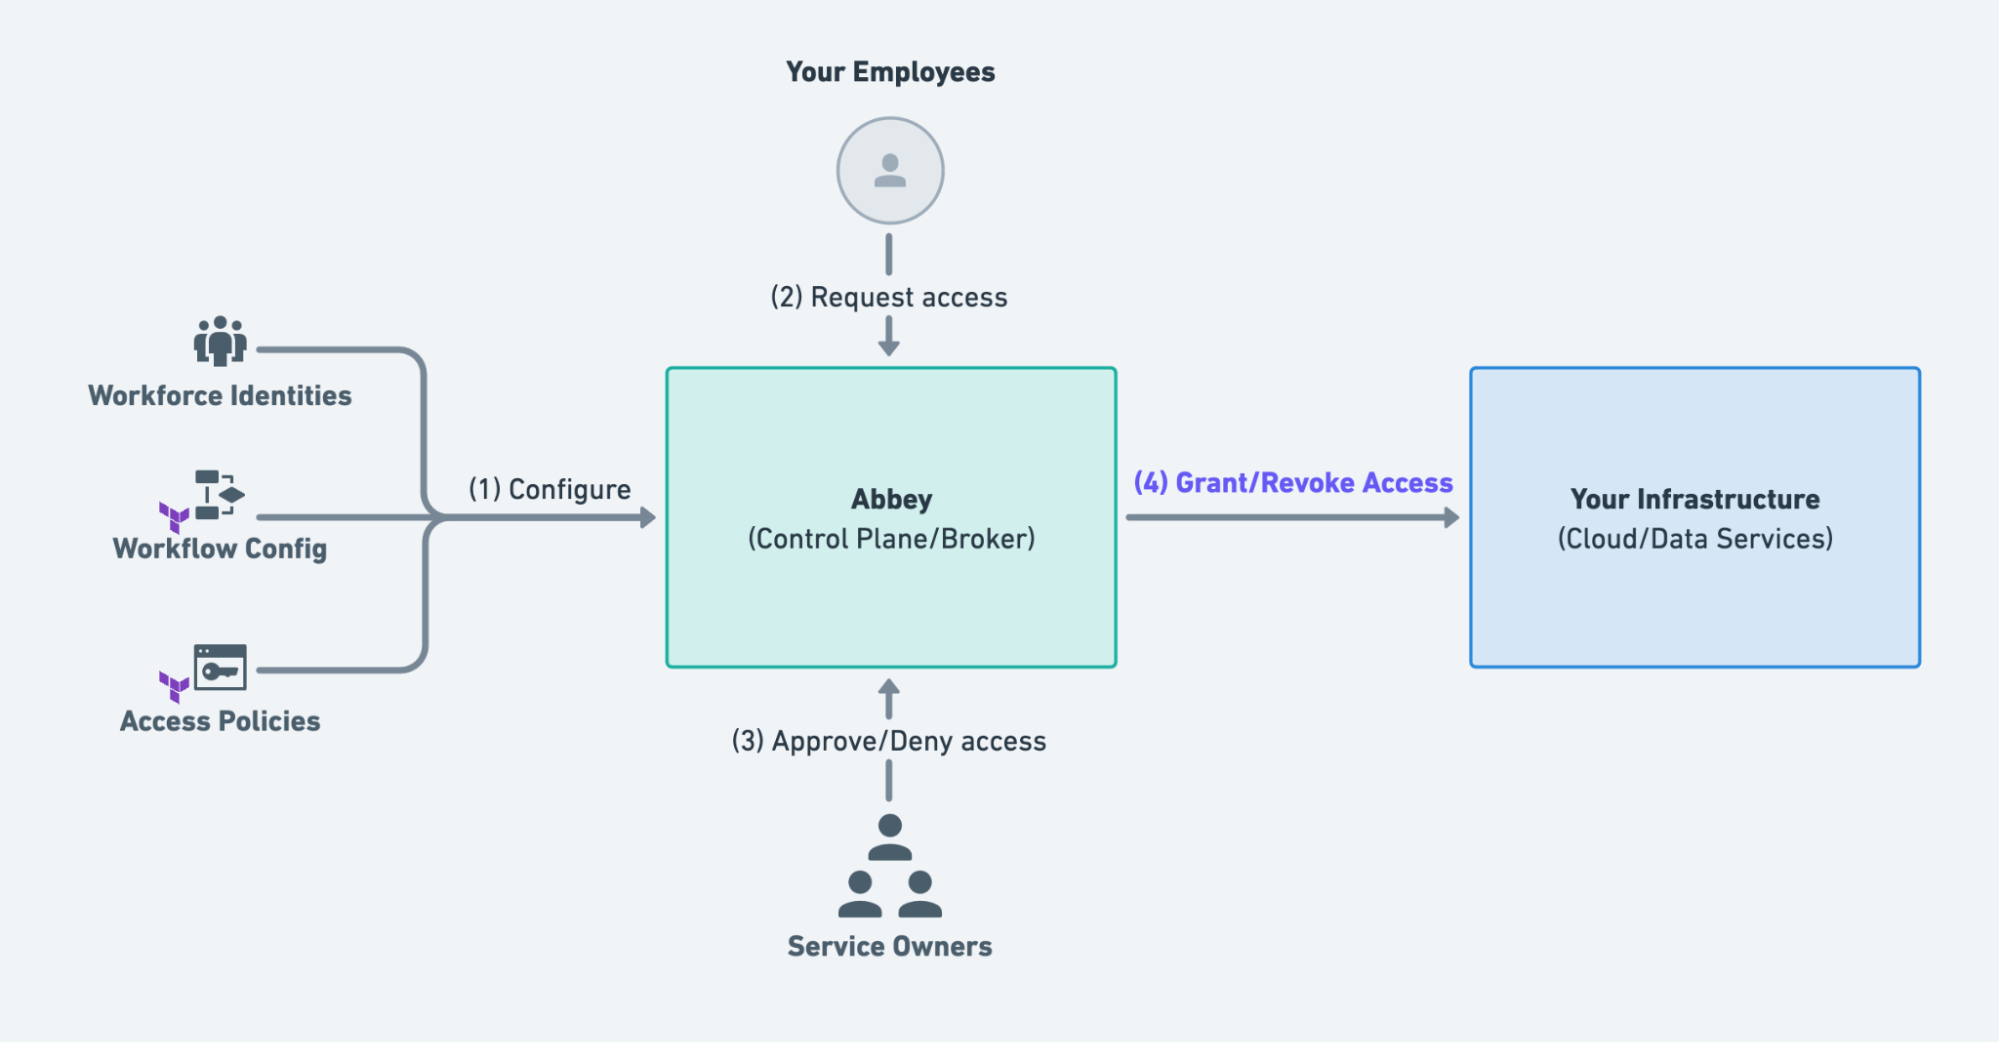
1. Configure
You configure Grant Kits and Identities (which we’ll explain later in more detail) in a GitHub repository.
2. Request Access
Through the Abbey web app, an employee requests access to resources defined by the Grant kits.
3. Approve/Deny Access
One or more designated reviewers need to approve the access request in the Abbey web app.
4. Grant/Revoke Access
If all conditions have been met, Abbey will grant access to the resources for the designated amount of time.
To accomplish the delicate process of granting access to individuals, Abbey uses 3 distinct components:
Terraform
Terraform is used to declare your grant kits, identities, and access resources. Because Terraform is one of the most popular infrastructure as code tools, you have access to hundreds of official Terraform providers to use in combination with Abbey. Abbey supports all Terraform versions (OSS, Terraform Cloud, and Terraform Enterprise).
I’ve mentioned Grant Kits and Identities before, but what are they?
Simply put, a Grant Kit outlines the process for a user to acquire access to a resource through a request, who should approve the request, what rules and conditions must be met before the request can be approved, and how Abbey should grant that access when the request has been approved.
An Identity links Abbey accounts to other account identifiers such as an AWS IAM user or Okta user. The identity resource describes to who access should be given.
Both the Grant Kit and Identity are Terraform resources that are part of the Abbey Terraform Provider. When you create and materialize them by pushing them into Git, they will show up in your Abbey.io dashboard.
Abbey Web App
Abbey web app is the place you’ll go to create, approve, and revoke access requests from you and your teammates.
Git
When you push your Abbey project to git, your CI/CD will automatically materialize your Grant Kits, Identities, and access resources. An added benefit of using the Git version control system is that everything is auditable.
Demo
To solidify your understanding of what a Grant Kit and Identity is, let’s go through an example of how a Grant Kit and Identity would be used in a scenario where someone wants access to the AWS Identity Center Group for Admins.
We’ll start in Terraform by creating an abbey_grant_kit resource.
resource "abbey_grant_kit" "aws_iam_admin_group" { name = "aws_iam_admin_group" description = <<-EOT adds user to the IAM Admin group EOT workflow = { steps = [ { reviewers = { one_of = ["john.doe@abbey.io"] } } ] } policies = [ { query = <<-EOT package main import data.abbey.functions allow[msg] { functions.expire_after("24h") msg := "revoking access after 24 hours." } EOT } ] output = { location = "github://abbeylabs/how-abbey-works-blog-code/access.tf" append = <<-EOT resource "aws_iam_user_group_membership" "admin_membership_{{ .user.aws_identitystore.id }}" { groups = [ aws_iam_group.admin_group.name, ] user = "{{ .user.aws_identitystore.id }}" } EOT }}
A Grant Kit's workflow block contains one or more steps defining who should approve the request. That could be one, or multiple people in a multitude of configurations. In this case, johndoe@abbey.io is the only one who needs to approve this request for access to be granted.
The policy block allows you to add an Open Policy Agent policy that will be evaluated before access is granted. This can be used to validate data, allow or deny requests based on compliance or safety rules as well as add revocation rules. In this case, we have an inline policy that will automatically revoke access to the resource after 24 hours.
Lastly, the output block describes the actual Terraform resource that will grant you the desired access and where it should append it to. In our case that’s an aws_iam_group_membership referencing the IAM admin group and my abbey identity.
Here we associate our AWS IAM user to our Abbey identity, through the Abbey API.
curl -X POST \ -H "Authorization: Bearer $ABBEY_API_TOKEN" \ -H 'Content-Type: application/json' \ https://api.abbey.io/v1/users/000/apps \ -d '{"type": "aws_identitystore", "data": {"id": "123"}}'
Then, we make a commit and push the Abbey terraform resources to a GitHub repository that is connected to Abbey. If you want to learn how to do that, follow this guide.
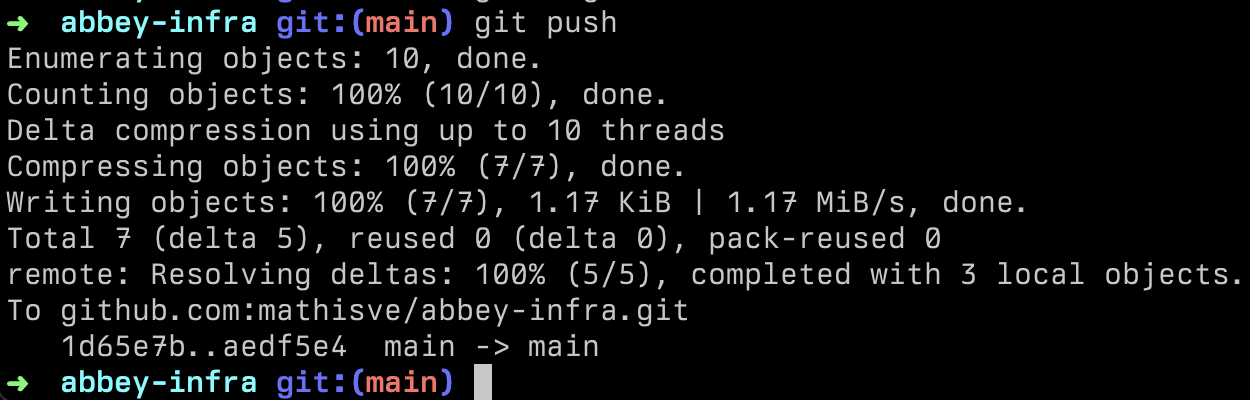
As soon as you push the commits, GitHub Actions will trigger a workflow to materialize your Grant Kits and Identities. However it is worth mentioning that this can also be achieved using Terraform Cloud, Atlantis, or any other orchestration system.
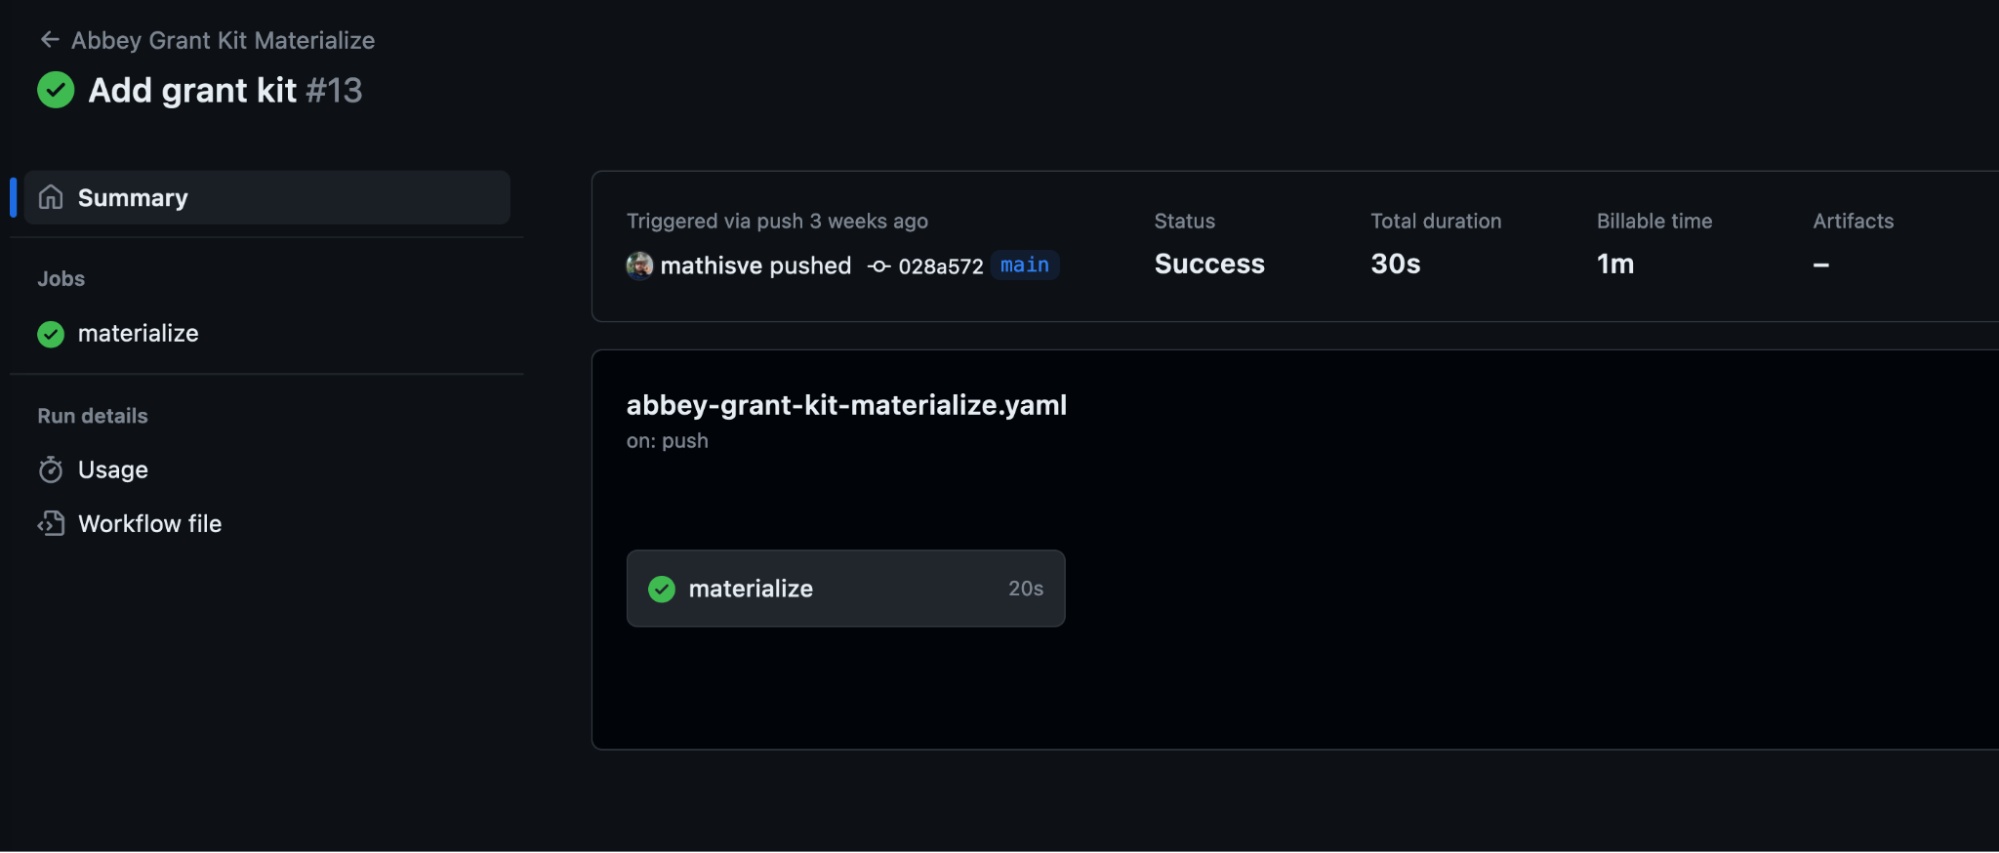
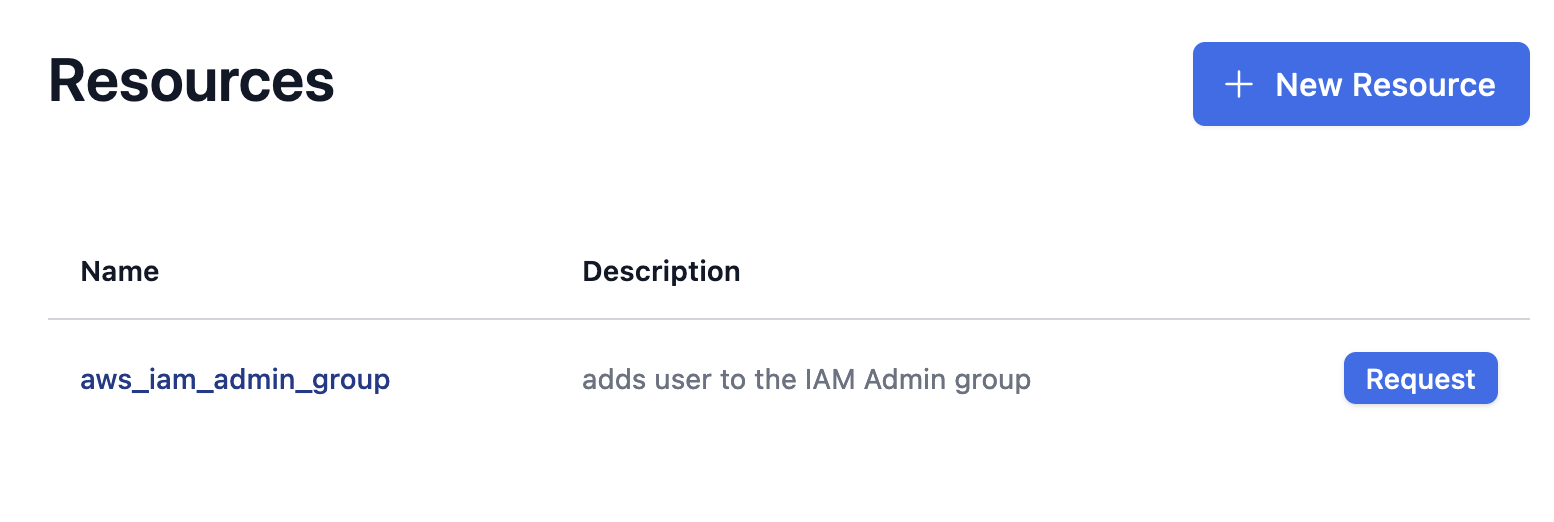
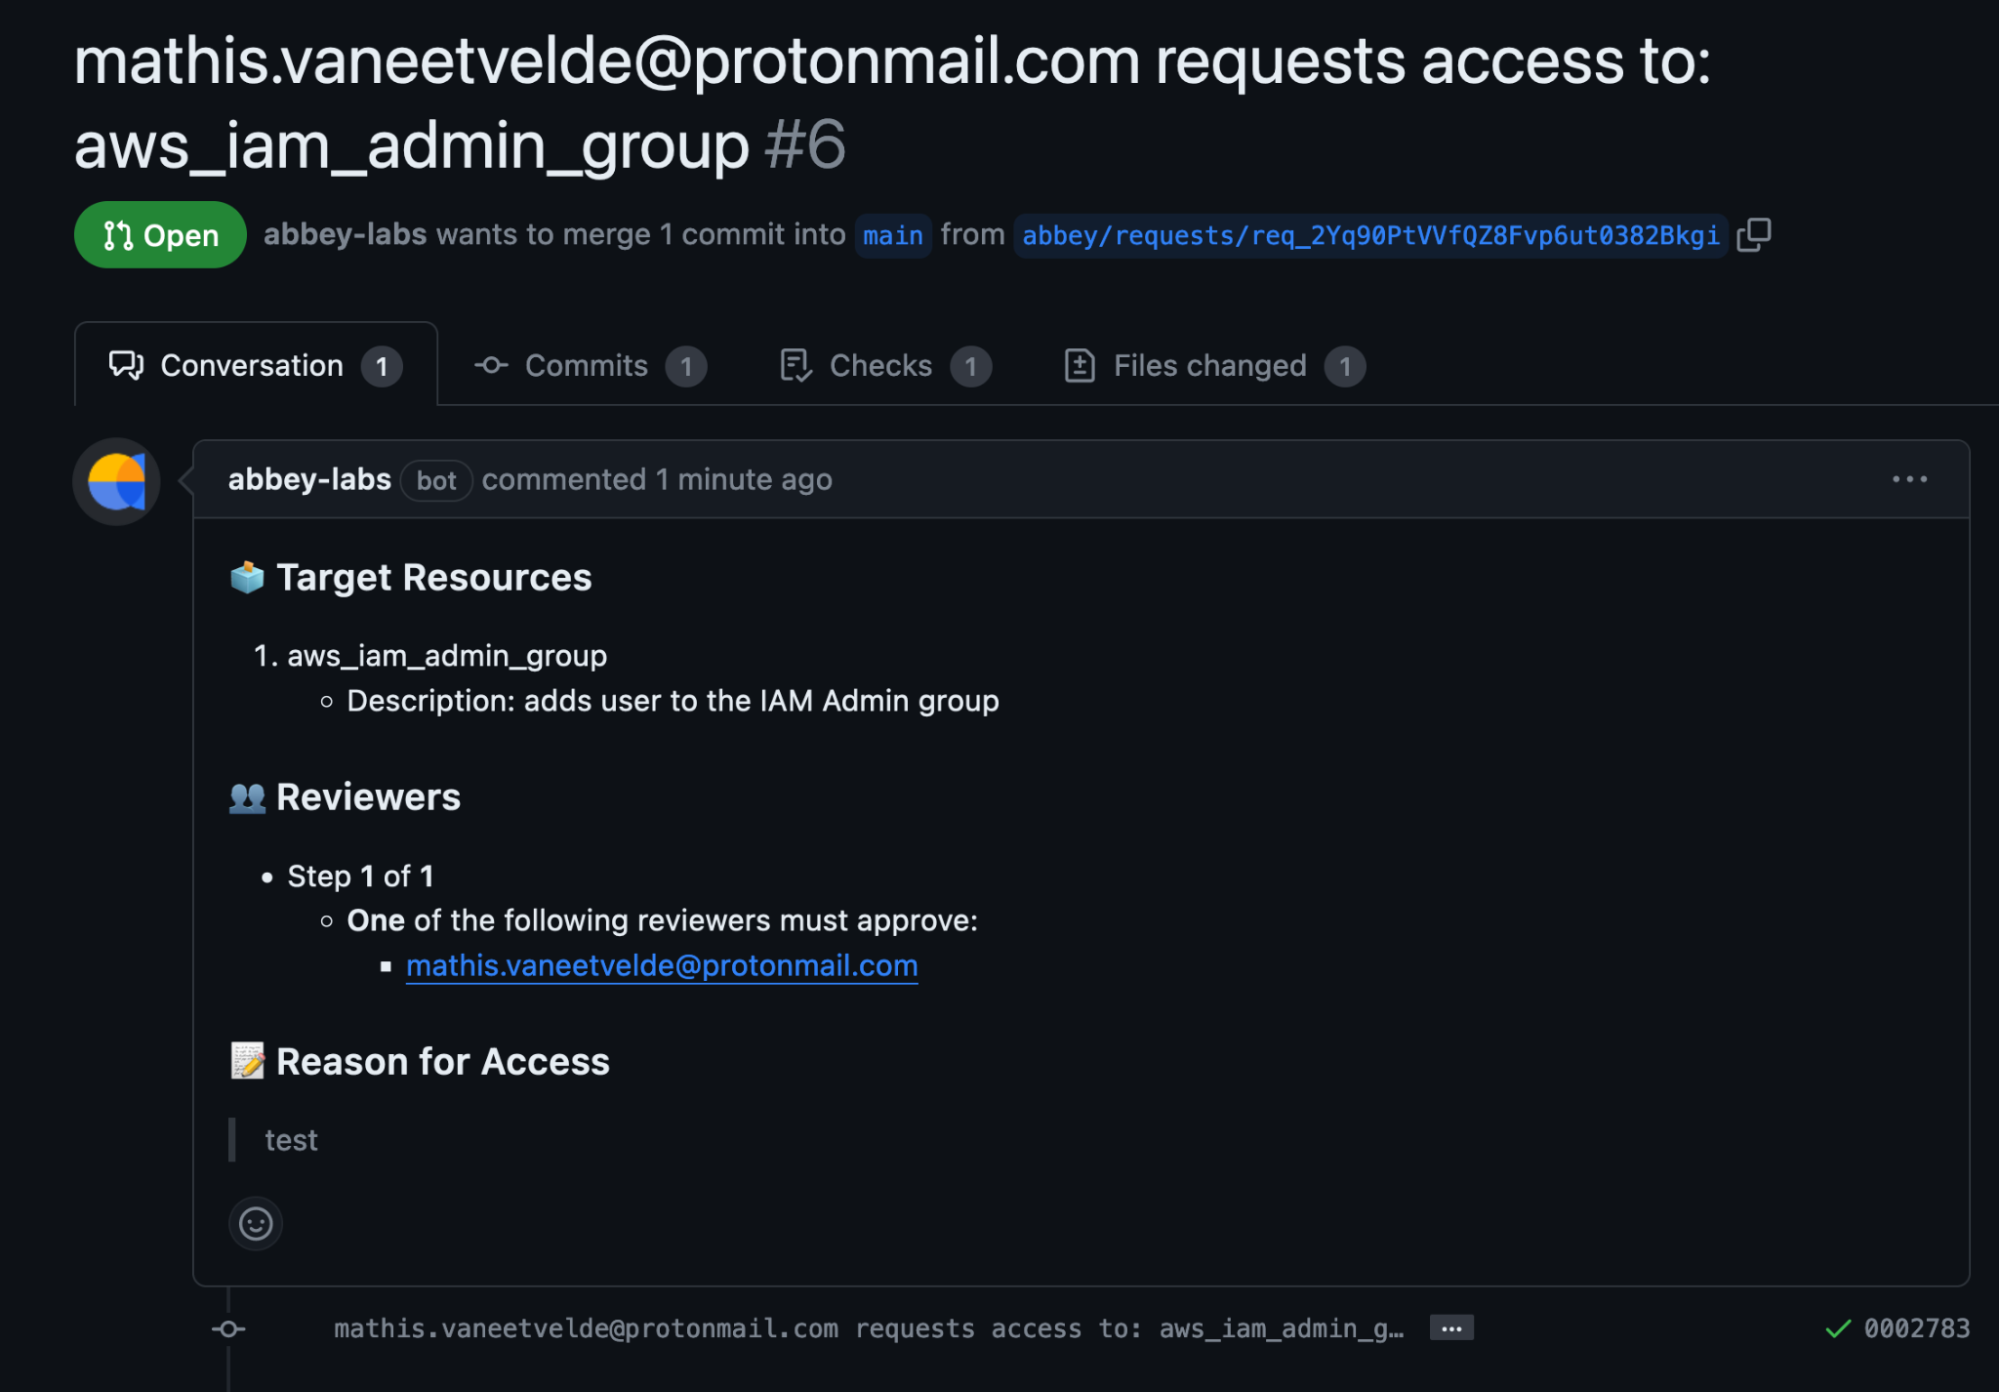
When the GitHub Actions workflows are finished, the resource (access to the IAM Admin group) described by the Grant Kit will show up on our Abbey.io resources page where you or someone else on your team can request access.
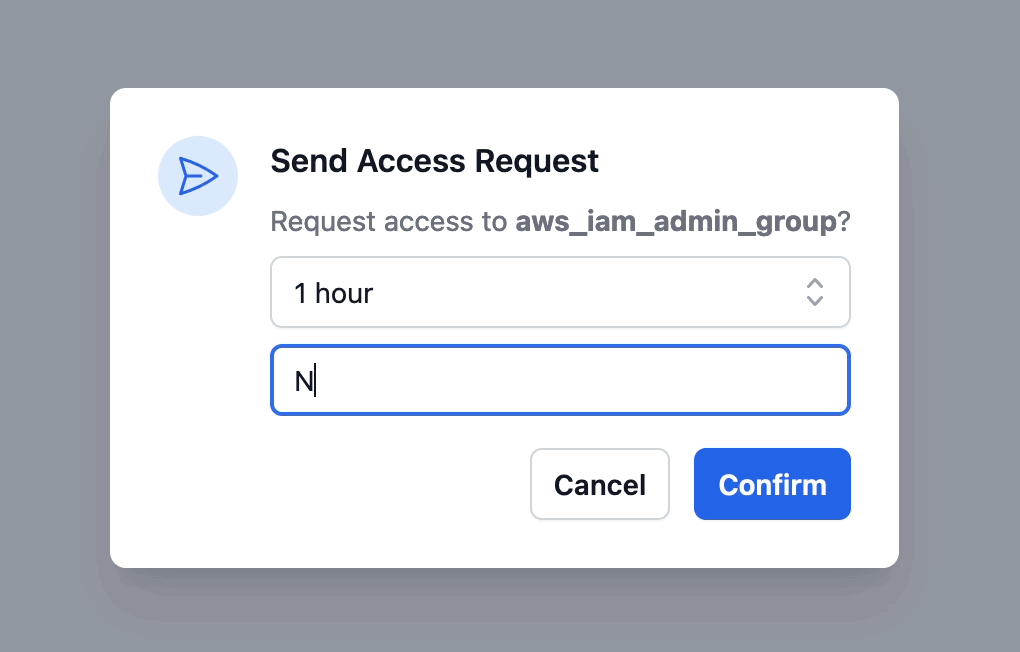
When you request access to a resource, Abbey asks you how long the access request should be valid and what the reason behind the request is. These will be presented to the reviewer as well as saved in the Git history.
As soon as you request access, Abbey will create a pull request in the aforementioned GitHub repository with the access resources that were described in the grant kit's output block.
Because all access requests and grants are stored in the Git history whether they are approved, expired or canceled; auditing access becomes a piece of cake compared to scouring AWS CloudTrails or Vault logs.
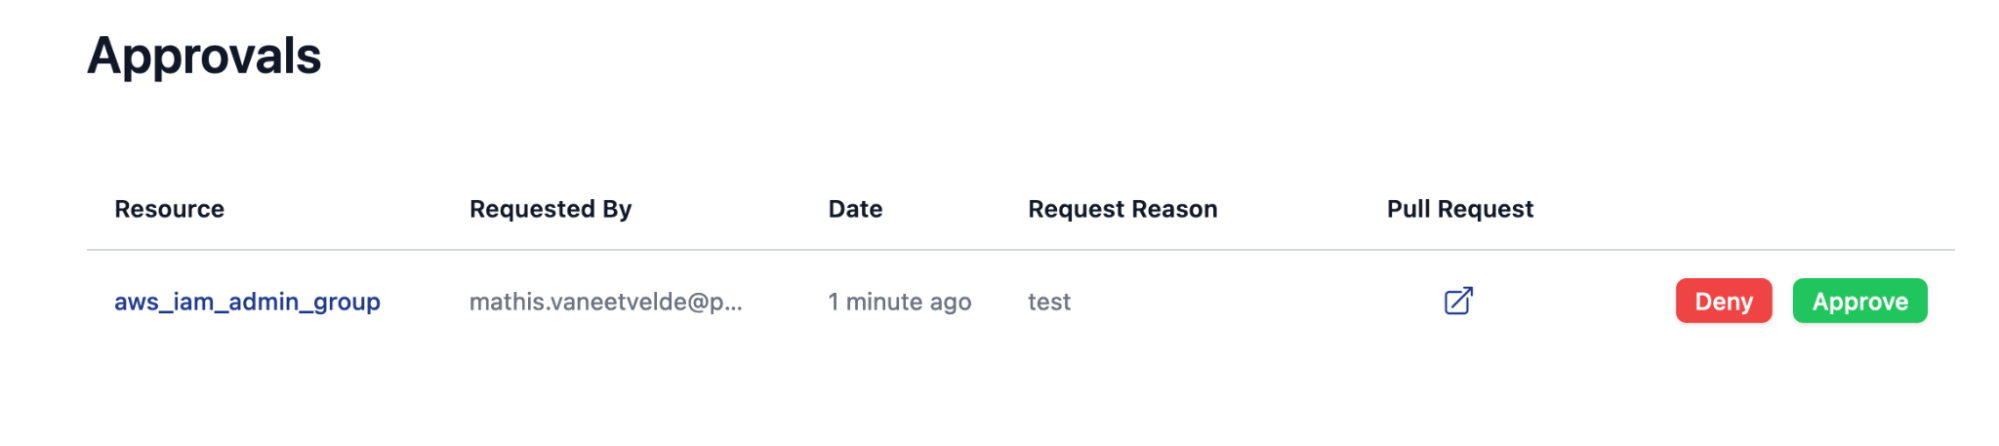
All that needs to happen now is the designated reviewers in the grant kit workflow attribute need to approve the request.

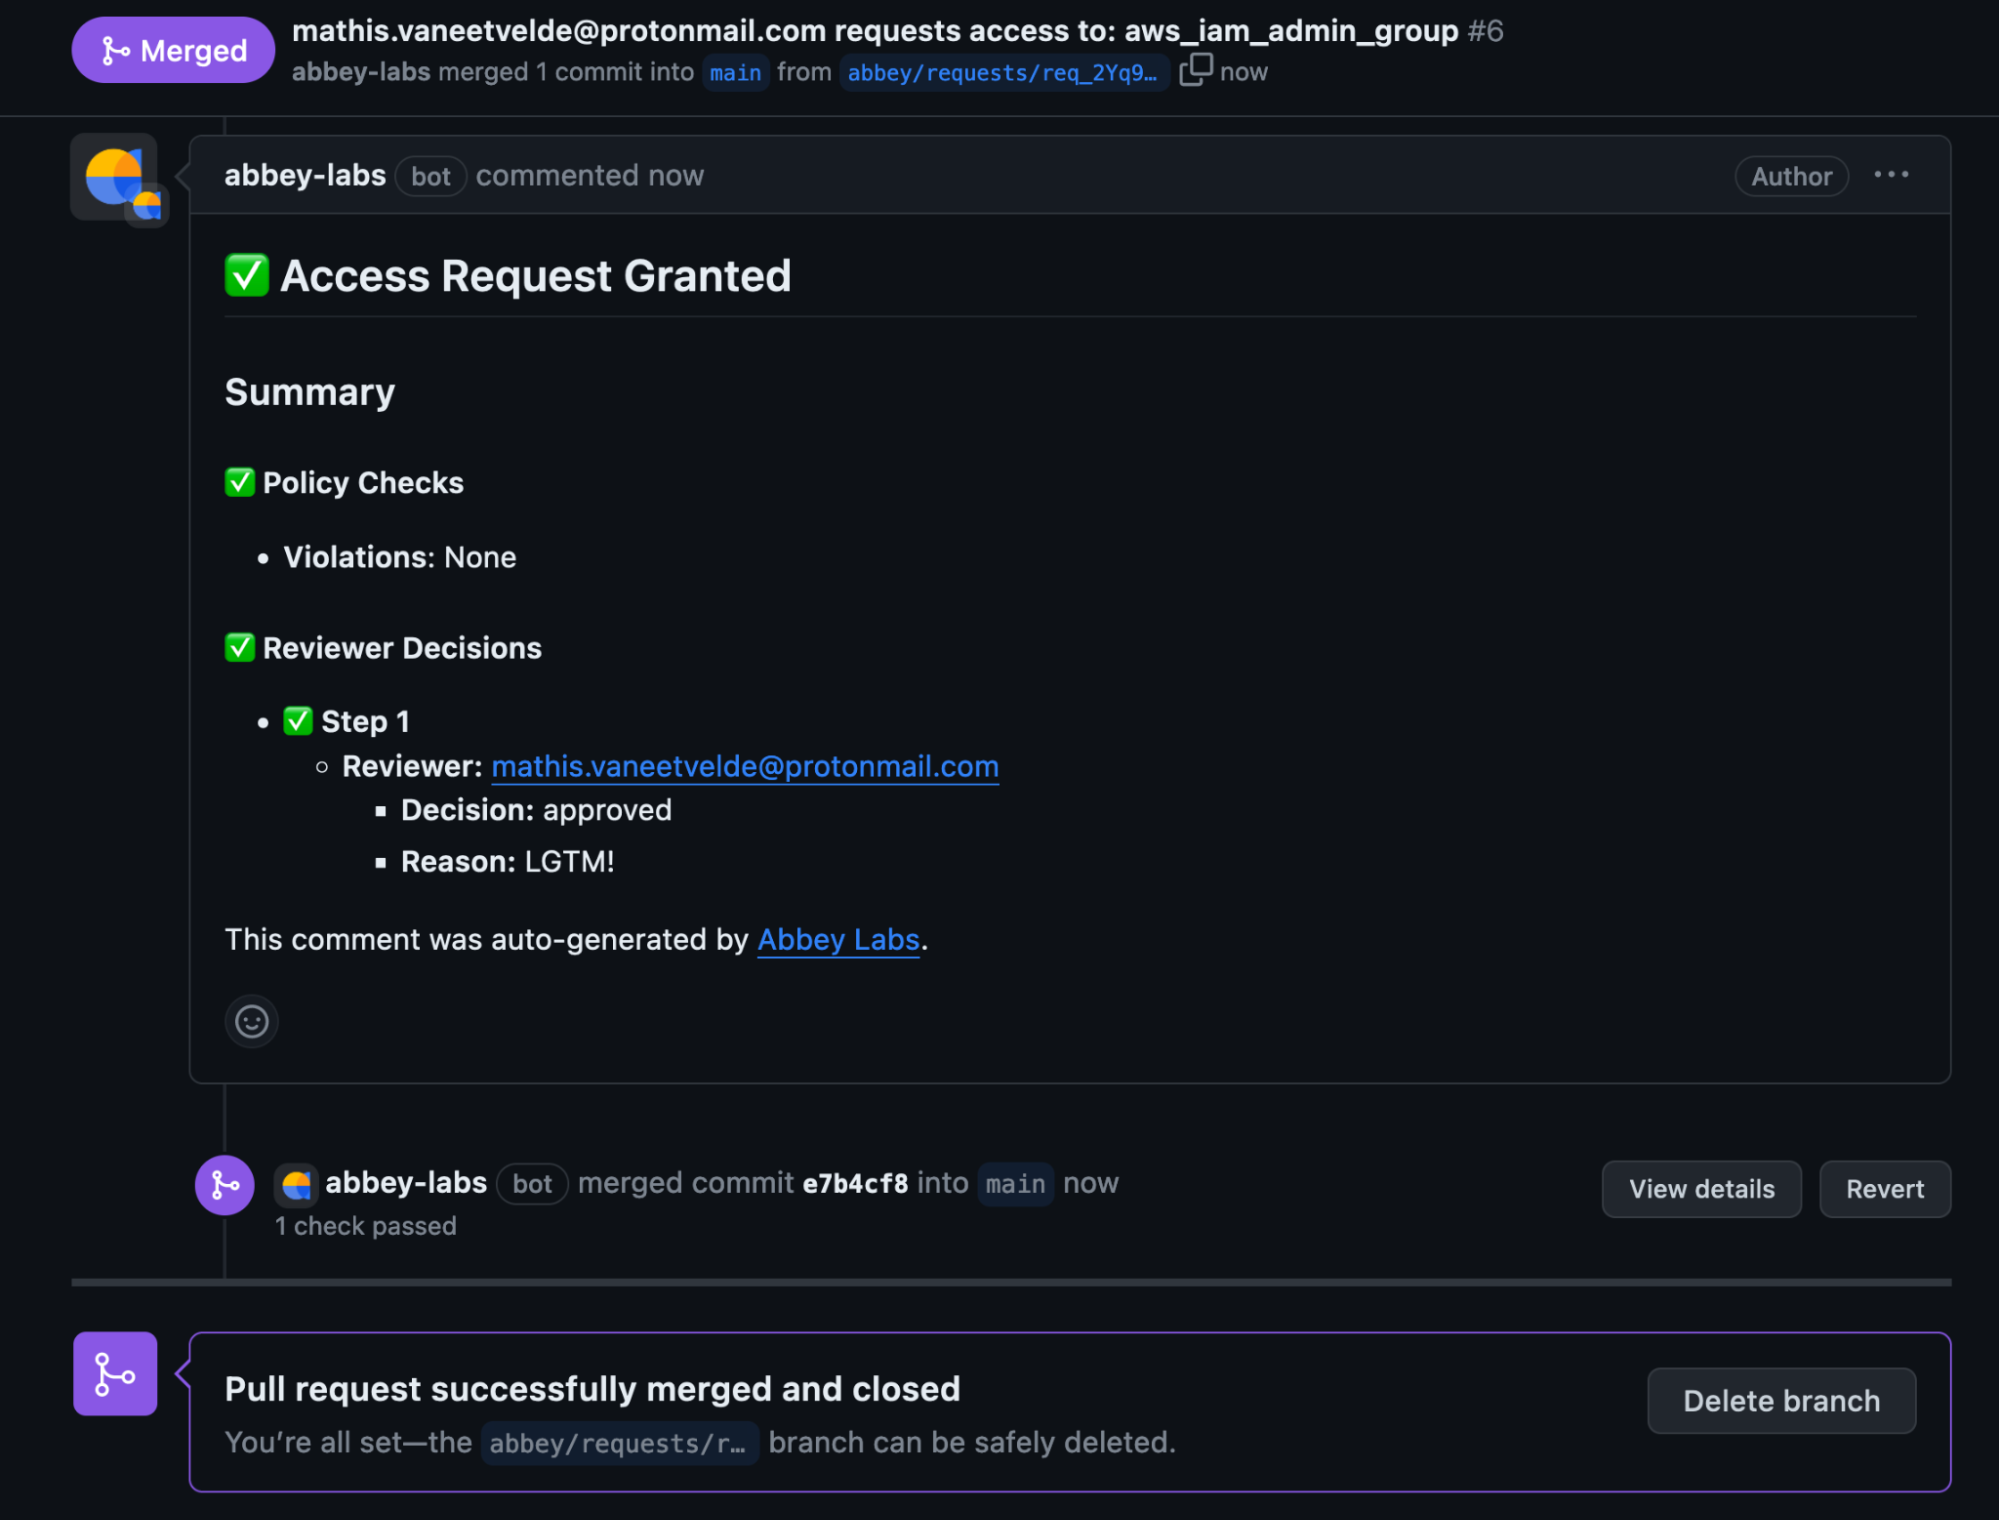
Once that’s done the PR will automatically be merged, then the GitHub actions workflows will run again and apply those Terraform changes and if everything goes well, the user will have access to your requested resources.
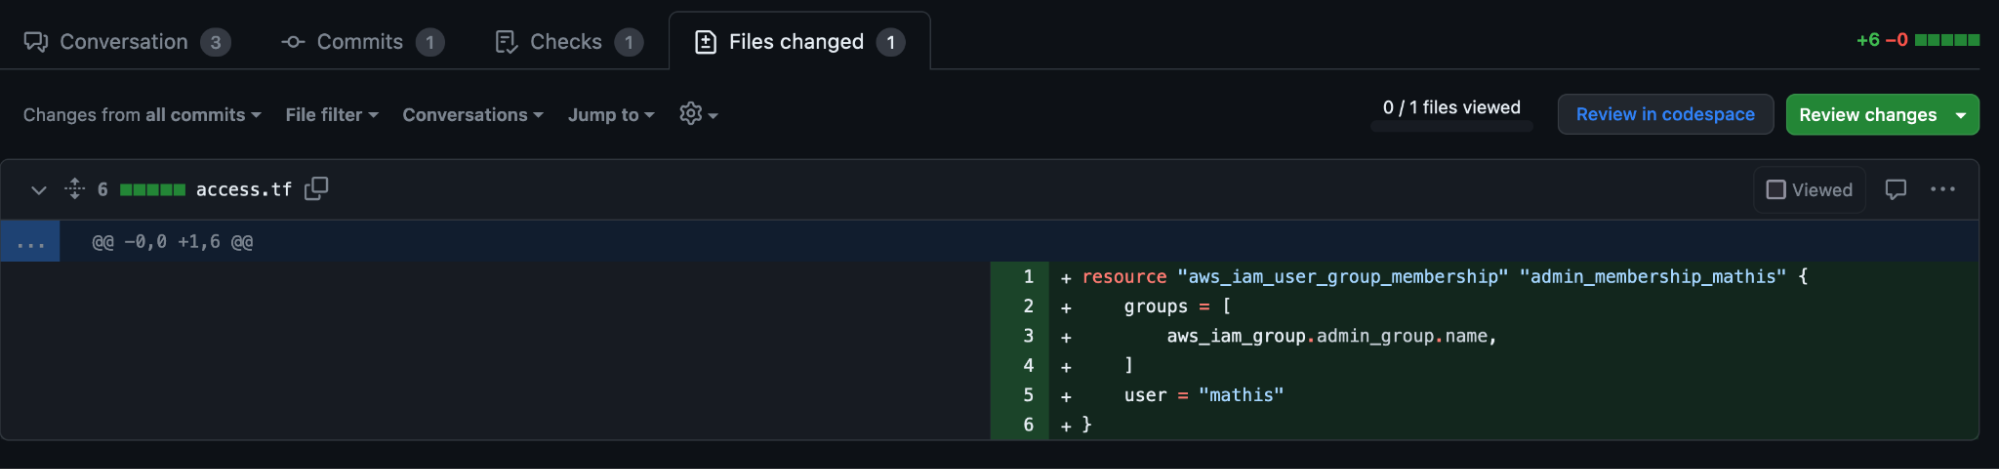
Below you see a commit diff of what resources Abbey added to the access.tf file in our repository. This Terraform resource was then deployed using GitHub Actions.
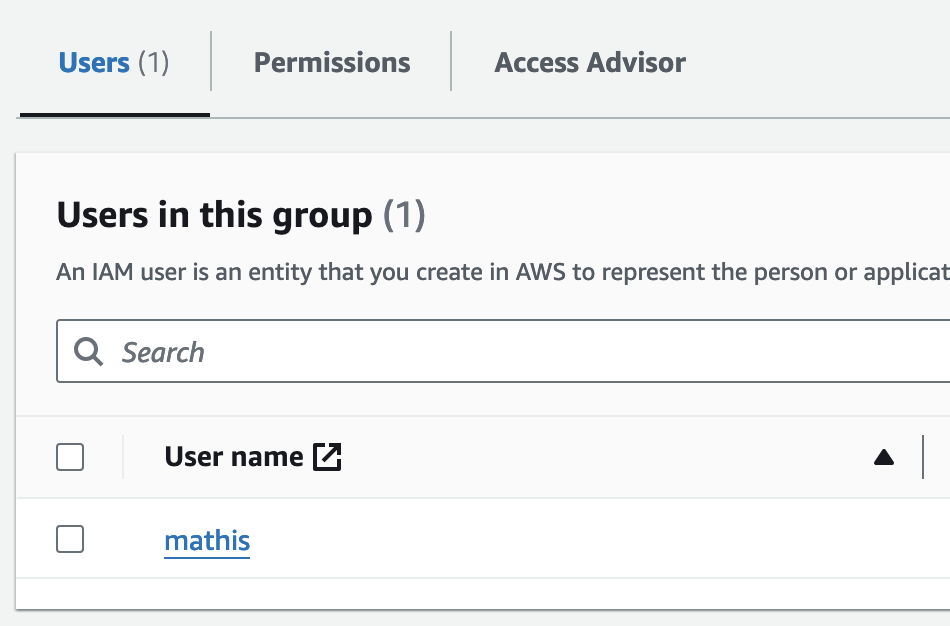
And as expected, our AWS IAM user is now part of the AWS admin group as intended.
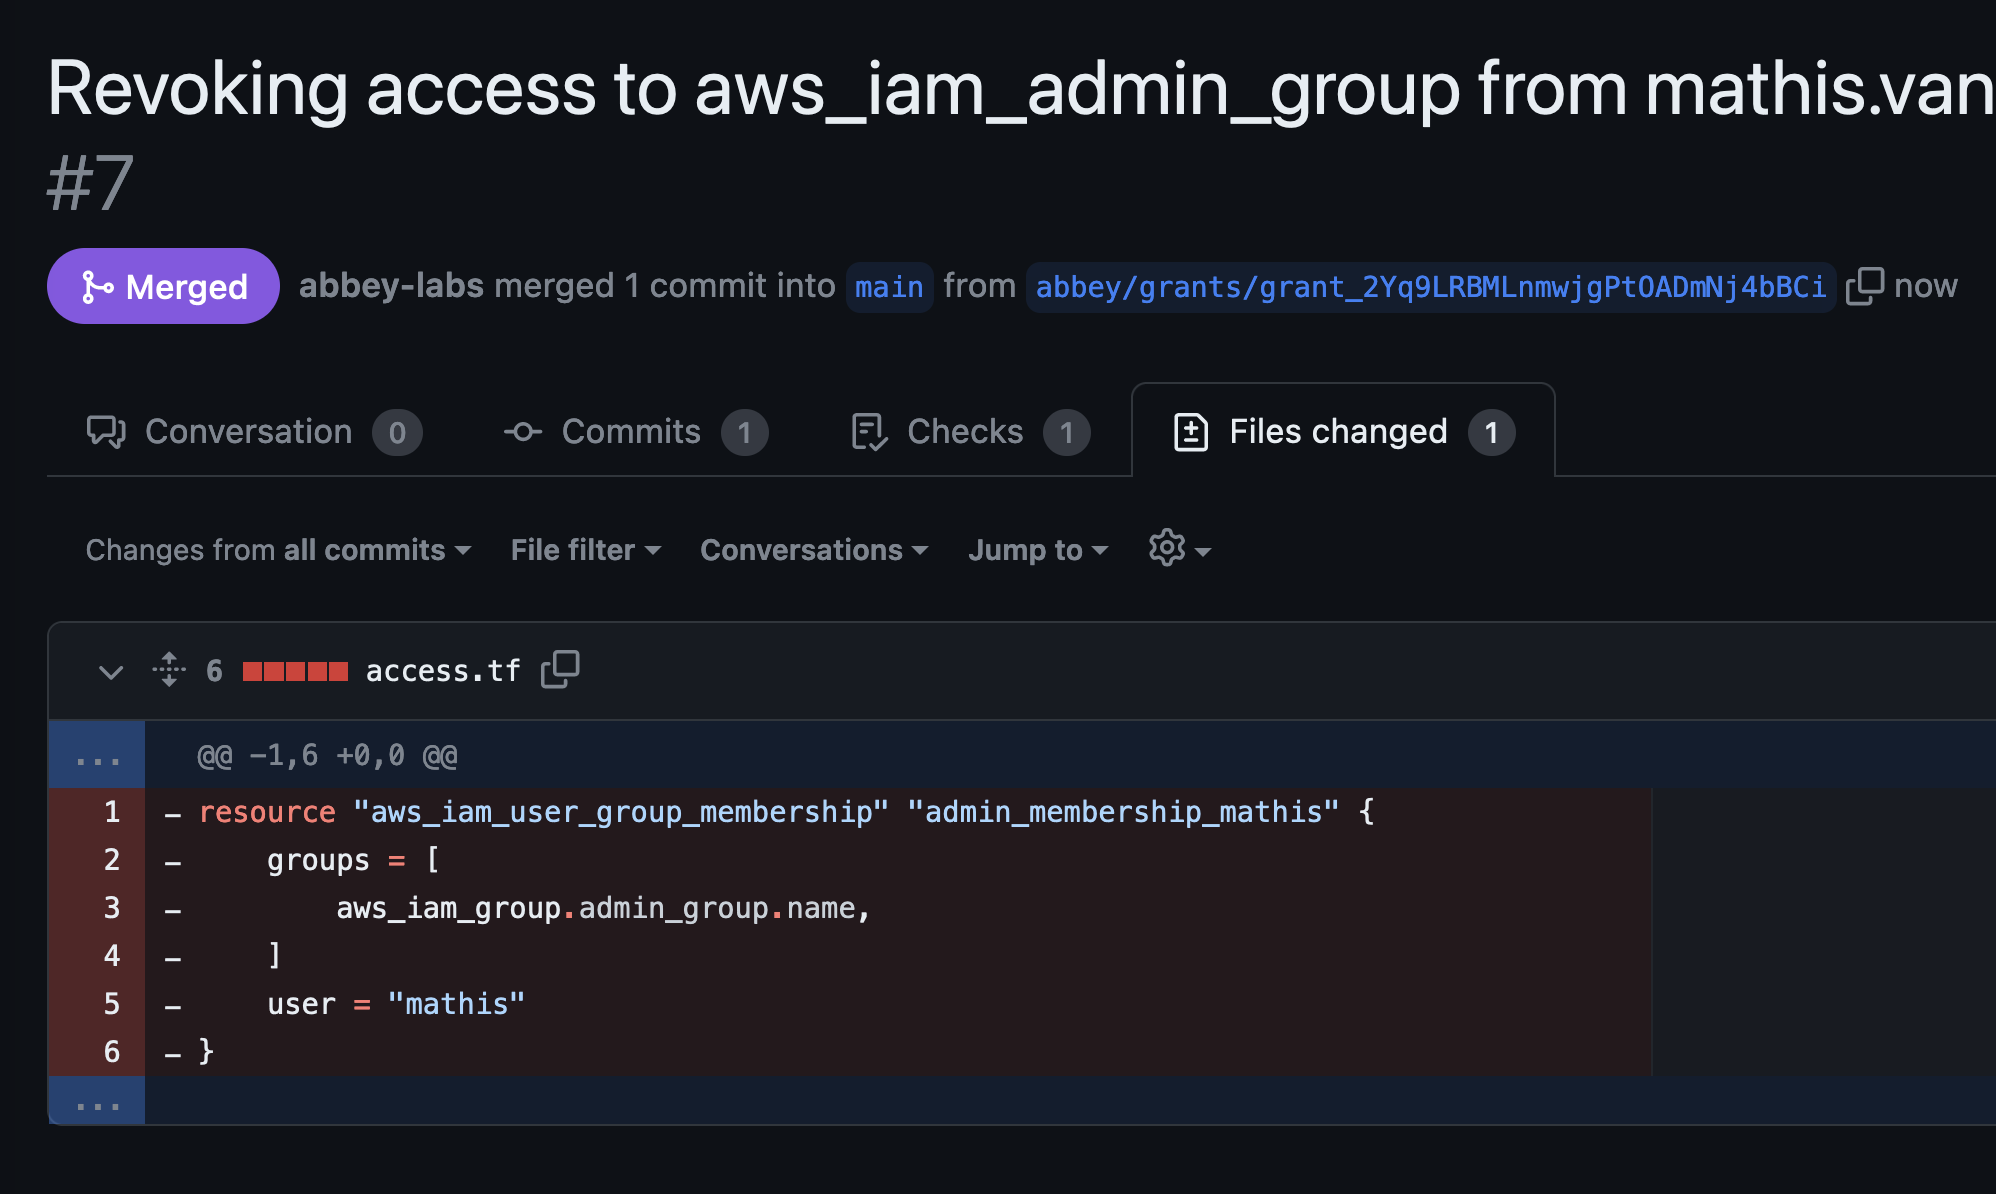
If you’ve added a policy to your grant kit that describes an expiration date, Abbey will automatically create and approve a pull request to remove that access resource when that time comes.
And there you have it! That’s how Abbey can provide your engineers with easy, right sized, and auditable access to your cloud resources using Terraform and Git.
This was a very simple example using just a single Grant Kit and Identity. But with the extensibility of Terraform, the sky's the limit when it comes to being able to build out scalable and (more importantly) manageable access solutions with Abbey.
If this blog piqued your interest and you would like to try Abbey for yourself, I highly recommend trying out the getting started tutorial to find out how to get up and running with Abbey. If you’re feeling confident you can always find an application-specific quickstart that matches your use case and utilize it as a starting point.
Lastly, I would love to invite you to the official Abbey community Slack where our engineers would love to answer any questions or address any concerns you may have.
Automate access management with Terraform today.
Abbey is the easiest way to add automated access request flows to your existing Terraform resources.
Improve security. Reduce toil. Simplify compliance.